CONVENTIONS
QuickTIPs (and Links) are highlighted in blue.
Permission-based items are highlighted in red.
System navigation is italicized.
ADDING (AND MANAGING) EMPLOYEES
During the initial set-up of CurrentTrack® your agency’s Employee information was entered and basic Permissions were assigned. Over time, new Employees will be added and existing Employees removed. Their Permissions and Notifications will be refined, and their Personal Information will be updated. The following sections will lead you, and your Employees, step-by-step through these various processes.
ADDING AN EMPLOYEE
To add an Employee, go to Admin — Agency Administration — Add Employee. You may also use the ![]() icon at the top of the screen.
icon at the top of the screen.
NOTE: This option will only appear in the ![]() menu if you have Permission to Add Employee.
menu if you have Permission to Add Employee.
Simply fill out the dialogue boxes. The Name field must include the Employee’s First AND last name (e.g. Dawn Smith). The Login is the name s(he) will use to sign on, and your System Administrator will use to assign Tasks (e.g. Dawn). A good rule of thumb is to use his/her first name. If you’d like CurrentTrack to send the assigned Login details to the Employee, check the box beside Email Login Information to Employee and enter his/her E-mail (Work) address.
TIP: If two Employees have the same first name, use the portion of their e-mail addresses listed before the “@” symbol as their Logins (e.g. JSmith and JDoe).
The Address field of the Add Employee screen should reflect a home address, including street, city, state, and postal code, separated by commas. E-mail (Work) is the Employee’s agency e-mail address (e.g. dawn@currenttrack.com) whereas E-mail (Personal) is intended for an outside e-mail account such as the one used at home.
Within the Preferences section of the Employee profile page, enter (and/or select) the following details:
Tracklets — The indicated boxes will appear on the Employee’s Dashboard, once submitted. S(he) can then add more Tracklets (if desired). If granting access to either the Team at a Glance or Budget Vs. Actual Tracklet(s), the corresponding Permission(s) box(es) will also need to be checked, at the bottom of the page.
Birthday — This is an optional field that’s only viewable to those with Permission to Add or Edit Employee. It does not appear in the Employee Address Book.
Employee Type — Indicate whether s(he) is a Full-Time or Freelance/Contract Employee.
Vacation, Sick/Personal Time — Enter the number of allowed yearly hours for each category. At this time, the figures merely reside within the Employee’s profile for reference by the Accounting Manager. In the future, this information will be weighed against the number of recorded hours, for an indicated date span, within a separate report.
Notifications — Select the way(s) in which you’d like the Employee to receive system-generated Messages. When later editing their own personal information, Employees can modify these settings.
TIP: Be sure to include an E-mail (Work) address as it’s also referenced when submitting a question, comment or suggestion via ![]() .
.
Time Sheet Exempt — If the Employee is not required to complete a daily Time Sheet, check the box beside Time Sheet Exempt. S(he) will still have the option of entering time, on a daily basis, but will not be reminded of any incomplete, untouched Time Sheets.
Hire Date — Select the applicable date from the calendar box. A future Hire Date of up to 30 days from today’s date may be selected.
System Administrator — If the Employee is a CurrentTrack Administrator, check the box beside System Administrator. S(he) will then be granted all Permissions.
PERMISSIONS
When adding a new Employee to CurrentTrack, access privileges (i.e. Permissions) must be assigned. Obviously, not everyone needs access to everything. Copywriters don’t generally need to fill out a Dub Information Sheet, for example, but Accounting does need the ability to enter a Purchase Order (P.O.). Permissions can be assigned in one of two ways — via the Add Employee screen or the Manage Permissions interface.
To assign Permissions via the Manage Permissions interface, go to Admin — System Administration — Manage Permissions. Select the Employee name(s), or Employee Group, from the various drop-down menus and click Submit.
If, when adding an Employee, you checked the box beside System Administrator, his/her name will appear at the top of the Permissions table. It will NOT appear within the individually listed Permission boxes. It’s understood that a System Administrator has ALL Permissions.
To revoke System Administrator access, go to Admin — Agency Administration — Edit Employees — Full Name — Preferences. Un-check the box beside System Administrator and the Permissions table will appear within the Employee’s profile. Check the desired Permission boxes and click Submit.
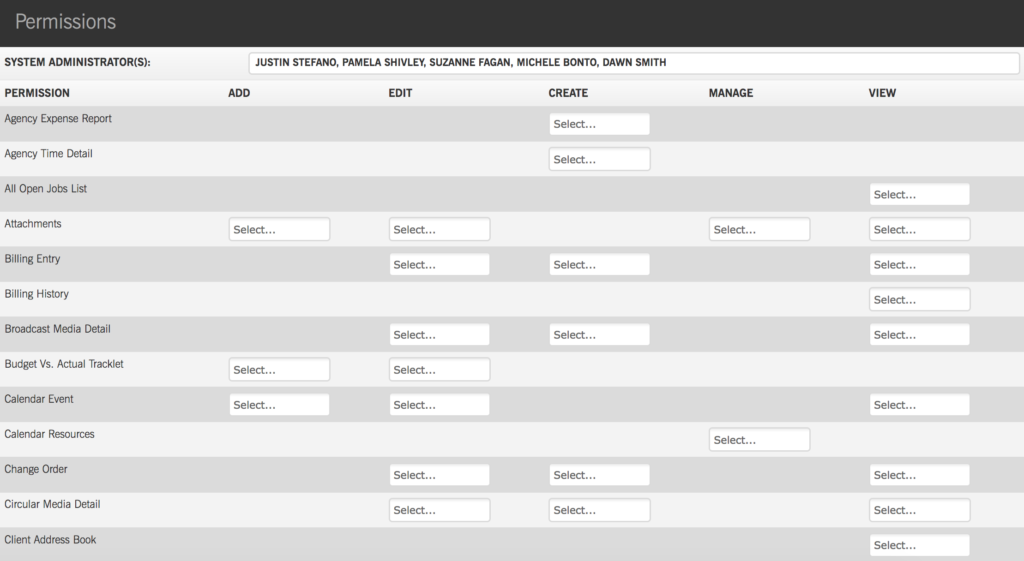
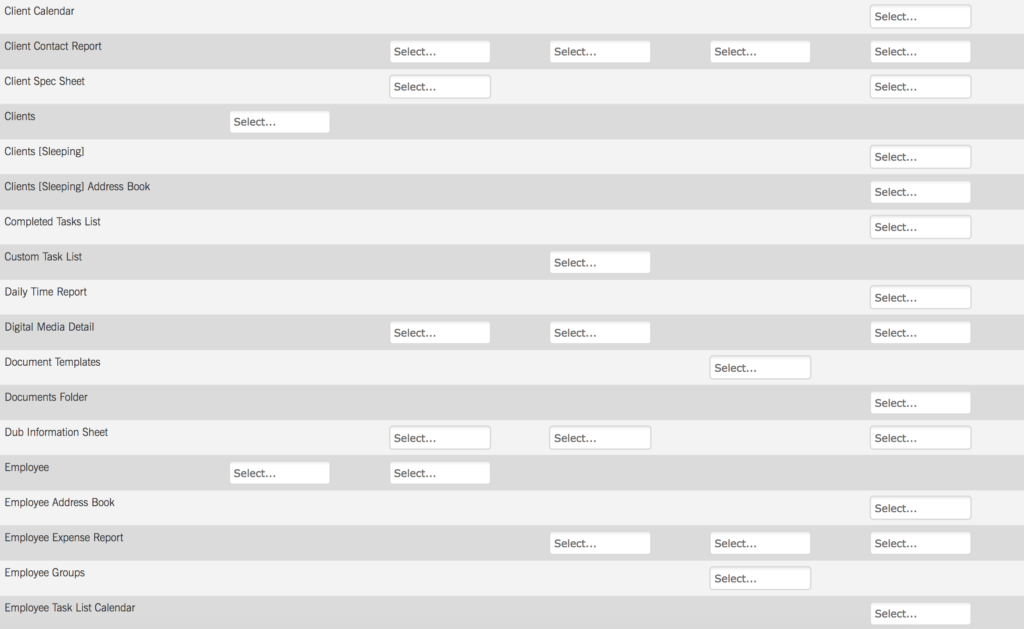
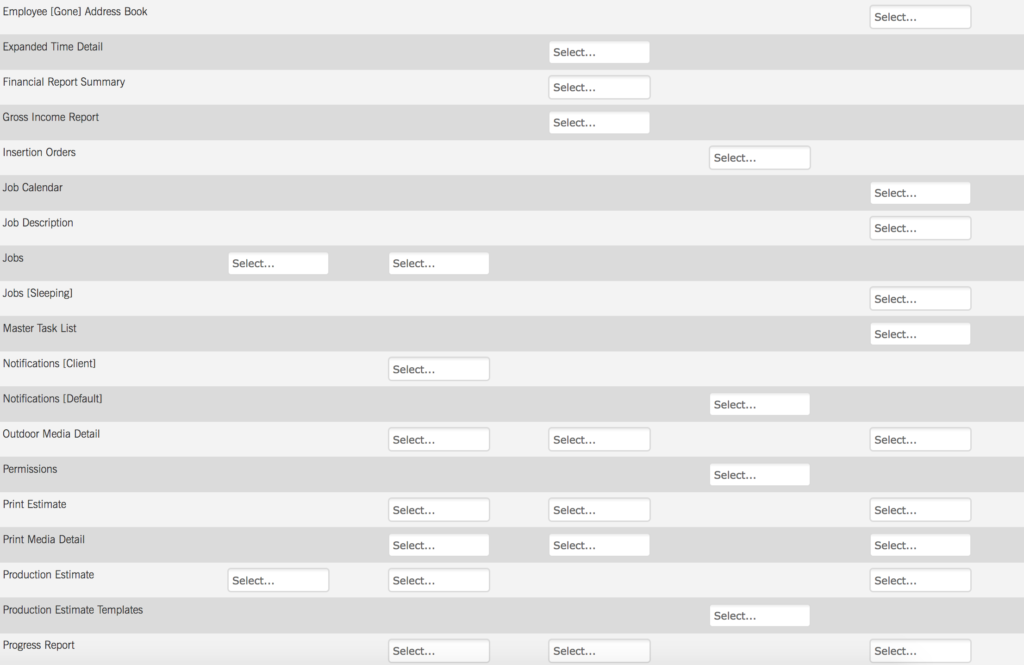
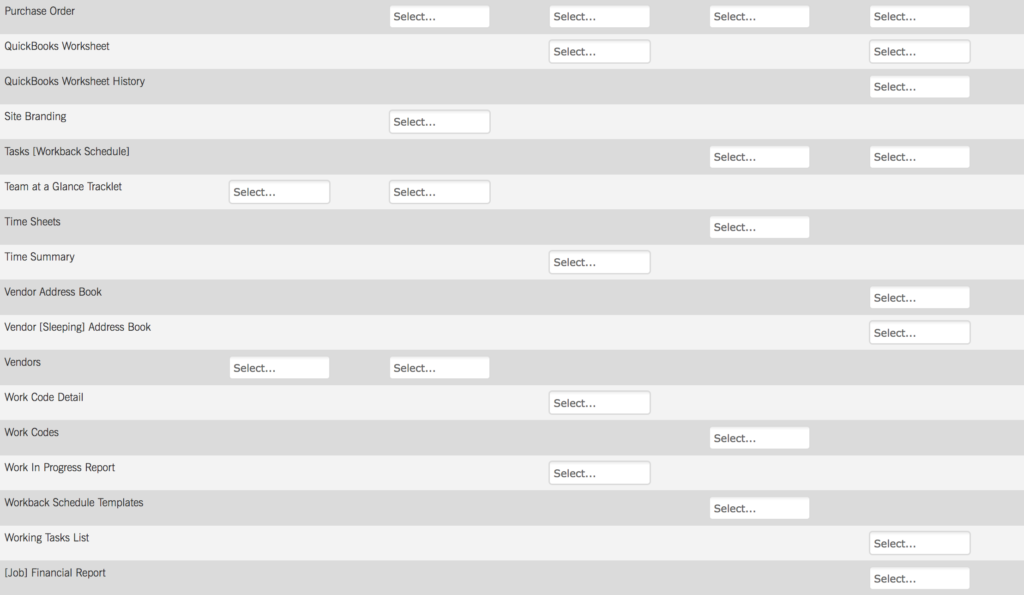
It’s recommended that your Accounting Manager have Permission to access the following features and reports, at minimum: Agency Expense Report, Agency Time Detail, All Open Jobs List, Billing Entry, Billing History, Client Spec Sheet, Financial Report Summary, Purchase Order, QuickBooks Worksheet (if applicable), QuickBooks Worksheet History (if applicable), Time Sheets, Time Summary, Vendors, Work In Progress Report, and [Job] Financial Report.
All Employees should have the following Permissions assigned to them, at minimum: [Add, View] Attachments, [View] Client Contact Report, [View] Clients, [Create] Employee Expense Report, [View] Employee Task List Calendar, [View] Job Description, [Create] Progress Report, and [View] [Tasks] Workback Schedule. In general, Employees can have Permission to [View] various documents (e.g. Media Details, Change Order, Dub Information Sheet, Estimates, and Address Books) and the Documents Folder itself; it’s entirely up to you.
“Big picture” reports such as the Completed, Custom, Master, and Working Tasks Lists, and the Team at a Glance Tracklet, are typically used by the Traffic Manager (or System Administrator). The Budget vs. Actual Tracklet, Financial Report Summary, and Working Tasks List are helpful tools for an Account Executive, for example.
EMPLOYEE GROUP(S)
CurrentTrack contains a grouping feature that enables you to easily cc: Employees and assign Tasks. Let’s say, for example, you want to cc: the entire Art Department on a Progress Report. Rather than entering each Employee name individually, you could simply click the Employee Group, “Art Department.”
To create an Employee Group, go to Administration — System Administration — Manage Employee Groups.
Enter the Name of the Group you’d like to create (e.g. Art Department) and its applicable Employees. If you’re creating more than one Group, simply repeat these steps; click Submit. Once an Employee Group has been created, other Employees can easily be added (or removed) via the Add Employee, Edit Employee or Manage Employee Groups screens.
To edit a Group, go to Administration — System Administration — Manage Employee Groups.
To delete a Group, go to Administration — System Administration — Manage Employee Groups — [click] Delete.
PASSWORDS
An Employee’s Login (e.g. Dawn) also serves as his/her Password when logging into CurrentTrack for the first time. Each Employee will need to change it immediately. For security reasons, we recommend all Passwords be six to eight characters long and include letters, numbers and at least one special character (e.g. Elv!s57 or Ch@ro38).
To change your Password, go to Admin — System Administration — Change My Password.
To reset an Employee’s Password, on his/her behalf, go to Admin — Agency Administration — Edit Employees — Full Name — Reset Password. Both the Login and Password will be reset to the Login that’s been assigned at the top of his/her profile (e.g. Dawn).
NOTIFICATIONS
When adding an Employee to CurrentTrack, Notifications should be assigned. Obviously, not everyone needs to be alerted when something is entered. Copywriters don’t generally need to know about a new Dub Information Sheet, for example, but Accounting does need to know when a Purchase Order (P.O.) has been submitted.
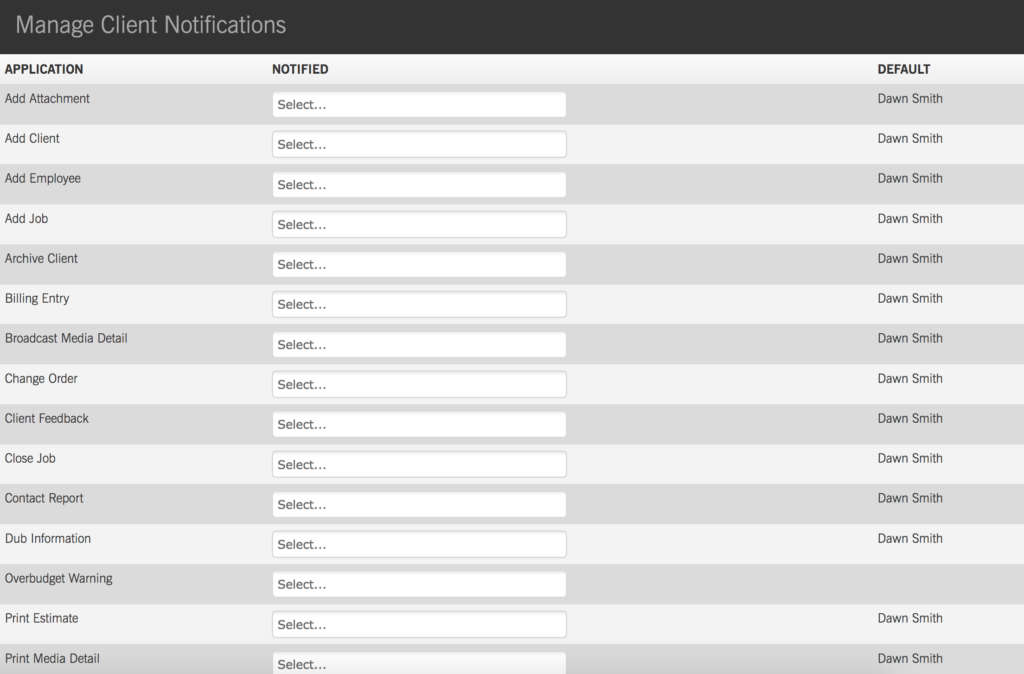
To manage Default Notifications, go to Admin — System Administration — Manage Default Notifications.
If you’re a System Administrator, we strongly recommend your name appear beside each item in the list. Otherwise, you won’t receive notification when a document is created. You’ll only receive Messages regarding documents on which you’ve been manually copied (cc:). The Notifications you assign in this area will be applied system-wide. In other words, your Accounting Manager will receive Notification of all P.O.s, regardless of the Client under which they’re submitted.
If you’d like to further refine Employee Notifications — an Account Executive receives Over Budget Warnings for Clients A, B and X, for example — edit the Clients’ Notifications by going to Clients & Jobs — Client — I Want To: Edit Client Notifications. Enter the appropriate name(s) in the Notified column; click Submit. Listed Employees will receive Messages, in addition to Default Employee(s). Remember, Default Employee name(s) are automatically pulled from within the Admin folder (Admin — System Administration — Manage Default Notifications).

EDITING AN EMPLOYEE
To edit an Employee profile, go to Admin — Agency Administration — Edit Employees.
The details found on the Edit Employees screen can be sorted by Full or User Name, Hire Date, Time Sheet Exemption status, and E-mail notification by clicking on the respective column headers. Select the appropriate Employee and make any necessary modifications; click Submit. Upon clicking Submit, an Edit Employee Notice will appear. If you’re simply changing Employee contact information or Permissions, for example, click OK. If you wish to replace a former Employee with a new one, click Cancel and set the Status of the existing Employee to Gone; click Submit. Next, create a new Employee profile by going to Admin — Agency Administration — Add Employee. You may also use the ![]() icon at the top of the screen.
icon at the top of the screen.
NOTE: This option will only appear in the ![]() menu if you have Permission to Add Employee.
menu if you have Permission to Add Employee.
Attempting to use an existing Employee record for a new Employee by simply overwriting the Name and Login fields will cause errors.
REMOVING AN EMPLOYEE
If an Employee leaves your agency, you’ll need to remove him/her from CurrentTrack by going to Admin — Agency Administration — Edit Employees.
Select the Employee from the Full Name column by clicking on his/her name. Next, change Status to Gone and enter the date of departure; click Submit. When an Employee’s Status is changed to Gone, the following occurs:
1. You’ll be prompted to move any Working Tasks, for which s(he) is Responsible, to another Employee(s). Click OK and choose the Employee(s) on the following screen. If you click Cancel, the Working Tasks will appear at the bottom of the Master Task List, within the Gone Employees section. You can then manually move them by editing the Workback Schedule(s).
2. His/her name will be removed from the Permissions list.
3. His/her name will be removed from the Default and Client-Specific Notifications lists (if applicable).
4. His/her name will be replaced, within all Workback Schedule Templates (if applicable), with the name of the individual who changed the Status field to Gone.
5. His/her name will be removed (if applicable) from the Account Executive and/or Account Coordinator field(s) of all Client Spec Sheets.
6. His/her name will be removed from all Employee Groups (if applicable).
7. His/her Login and Password will be deactivated and s(he) will no longer be able to log in.
All documents that were created by the now Gone Employee, and all Time Sheet entries, will remain intact.
REACTIVATING AN EMPLOYEE
If an Employee returns to your agency, re-activate his/her Login and Password by going to Admin — Agency Administration — Edit Employees.
Choose the Employee from the Full Name column by clicking on his/her name. Change Status to Here and re-assign relevant Permissions (and Notifications); click Submit. His/her Login and Password will be the same as what was previously used.
PERSONAL INFORMATION
Once an Employee has been added, advise her/him to log in and further flesh out their respective profile by going to Admin — Employee Information. Basic Employee information — Name, Address, Home and Cell phone numbers, Extension, and Hired date are displayed on the initial screen of the Employee Address Book. Additional details appear within the “i” pop-up boxes located to the right of the Hired column.
TIP: Be sure to include an E-mail (Work) address as it’s referenced when submitting a question, comment or suggestion via ![]() .
.
Complete the E-mail (Work) field, and check the box(es) beside, “Notify me at the E-mail (Work) address…” under Preferences, if you’d like to receive system-generated Messages outside of CurrentTrack. If you’d like to receive notification within CurrentTrack of a new Message or Task assignment, check the box(es) beside “Prompt me in CurrentTrack…;” click Submit.
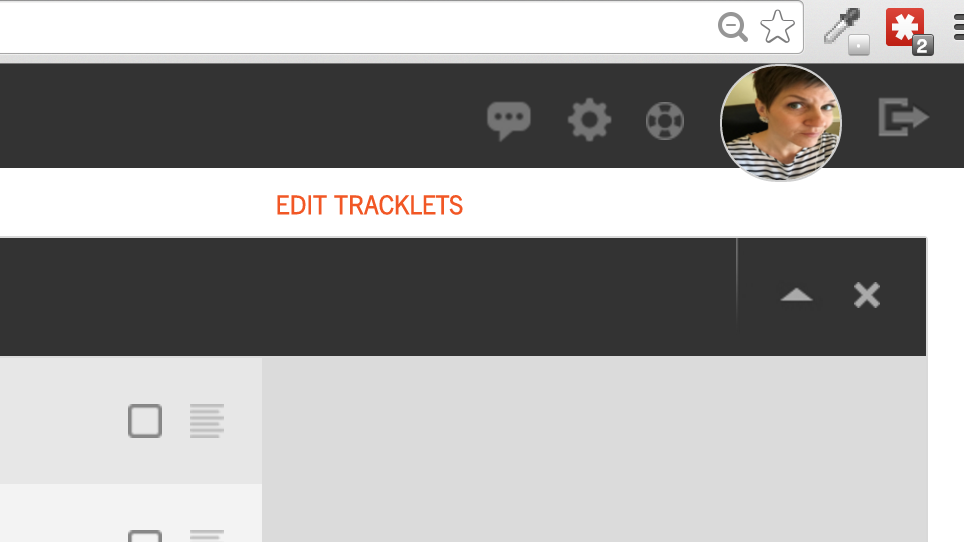
Lastly, upload a .jpg avatar (65 x 65 is ideal) to the Edit Profile field. This image will appear in the top right corner of your screen.
SCENARIO
Our Employees bill at a different hourly rate. How can we keep from having a hundred different Work Codes in CurrentTrack, yet still accurately track time?
In order to make the number of Codes less cumbersome, try the following:
1. Determine if there are any common functions among your Employees. Is proofreading $75/hr. regardless of who’s reviewing the materials? If so, create one Work Code called Proofreading (P) with a rate of 75.00. All employees can then record their time under (P).
2. Next, determine if any Employees can be grouped together under the same Code and Rate. For example, five Employees do creative work. Three of them bill at $100/hr. Create a Code called Creative A (e.g. CA) with a rate of 100.00. The other two Employees bill at a rate of $75/hr. Create another Code called Creative B (e.g. CB) with a rate of 75.00.
3. Lastly, create individual Work Codes for Employee’s whose time doesn’t fall into either a common Code or grouping.
SCENARIO
How can freelancers be managed in CurrentTrack?
OPTION 1: Add him as a user for the month(s) he’ll be working for you. He can then record his own time via his Time Sheet. You can also cc: him on documents, assign him Tasks, etc. When the project concludes, simply change his Status to Gone and he’ll no longer be able to access CurrentTrack. In the future, when he works on another project, simply change his Status back to Here and he’ll again be able to use the system.
OPTION 2: Add him as a Vendor and enter a Purchase Order (P.O.) for the time he’s accumulated (e.g. 10 hours @ 100.00 > $1,000 P.O.). At the end of the year, for example, Manage Purchase Orders and search for his information (i.e. Vendor) to determine precisely how much he was paid over previous months. When assigning Tasks, make an internal Employee Responsible and ask him/her to follow up with the freelancer to make sure the work will be done on time.